The first flexagon was a hexagonal object folded from a straight strip of paper. This simplest model is quite easily constructed.
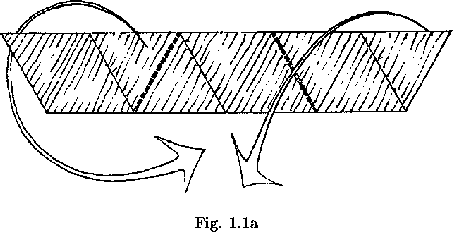
Fold off and cut out a sequence of equilateral triangles (see figure 1.1a). Nine of these are to be used in the flexagon. Folding up the flexagon is accomplished by folding consistently clockwise or counterclockwise at every third hinge between triangles (see figure 1.1). If the direction of folding is not consistent, the flexagon will loose both its symmetry and its stability.
It will not hold together. When this process has been completed su-ccessfully and the ends have been taped in place, the resulting object should resemble that shown in figure 1.1b.
It can now be seen that this flexagon is a kind of three twist Moebius band. It has one surface and one edge. In order to lay it flat, it has been symmetrically squashed out, giving six distinct hinged sections, each of which is called a ``pat".
Each triangle of paper making up the pats is called a ``leaf". It will be found that there are two kinds of pats. Some of the pats are one leaf thick, others two. Since the flexagon has tripole symmetry, any pair of adjacent pats that one should happen to choose would have one of each kind of pat. Such a pair will be referred to as a ``unit".
This is all very interesting, you may say, but what of the supposed ``flexibility"? Before investigating this, we must study the Moebius band a moment longer. Anyone familiar with the Moebius band must know that the twist is in a sense independent of the strip of paper; that is, the twist may be made to pass along the band, or, relative to the twist, the strip may be made to rotate about its open center while the twist remains stationary. The same is the case with our three twist flexagon. We way perform this operation, with some difficulty, after a slight forcing of the ideally rigid leaves. This same operation, carried out in an easier fashion and without bending the leaves, is know as ``flexing".
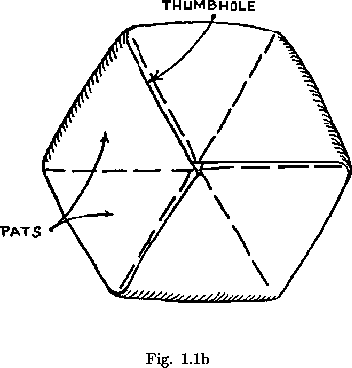
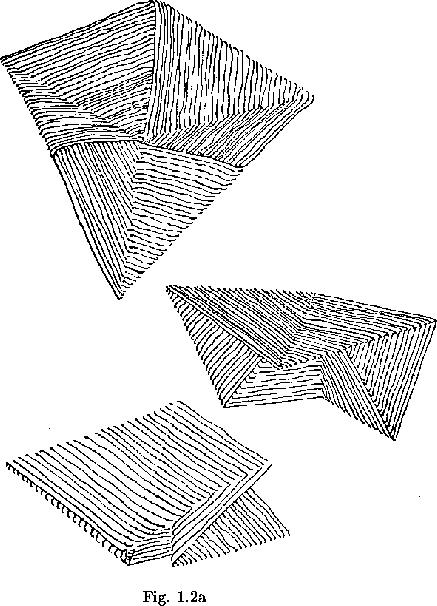
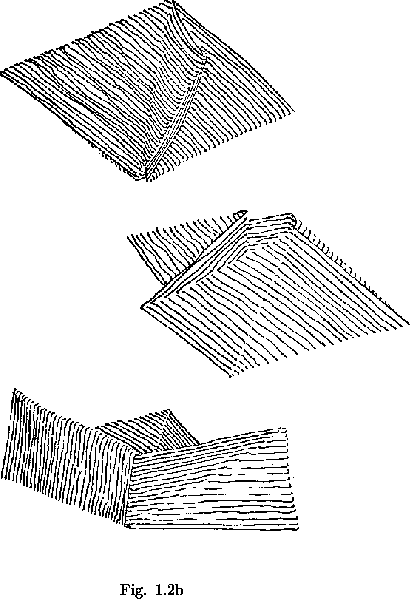
In order to flex the flexagon, one must first find a hinge between two pats at which the thumb of finger can be passed between the two leaves of the larger pat. Such a hole has been named a ``thumbhole" (see figure 1.1b). When a thumbhole hinge has been found, the two pats on either side should be pushed together. In doing this, fold the pats down away from the thumbhole hinge. It may now be seen that, since alternate hinges are thumbhole hinges, each of the three units may be folded together in this manner. When each units has been folded, the result is a sort of three bladed affair. (see figure 1.2a).
Now enters the most interesting aspect of the flexagon. Due to double hinging, our three bladed object may be opened out again from either the top or the bottom end. One can, of course, lay the flexagon flat by performing the reverse of the process just completed. But this reverse process may also be carried out from the downward end of the flexagon, exposing the faces that had been hidden in the flexagons's folds (see figure 1.2b). This latter operation is the essential part of the operation know as ``flexing", and is found to correspond exactly to the Moebius band type of operation.
Now that the flexagon is again flat, is may be rotated ![]() about its center to the right position for flexing again.
This completes the full ``fle-xing" operation. Thus the process can be carried out again, and then again. We can flex in this manner indefinitely, just as we can perform upon the Moebius band indefinitely. Facility in flexing may be developed with very little practice.
about its center to the right position for flexing again.
This completes the full ``fle-xing" operation. Thus the process can be carried out again, and then again. We can flex in this manner indefinitely, just as we can perform upon the Moebius band indefinitely. Facility in flexing may be developed with very little practice.
It is much easier to appreciate the flexagon if we mark it in some way so that we can see just what is happening. A number of interesting marking devices are used. Probably the most common and also the most sensational is color. Several different coloring schemes may be used. We shall use the simplest arrangement possible. Other systems will be shown as the need for them arises. Color the top surfaces of each of the six pats red. Turn the flexagon over and paint the exposed surfaces yellow. Color the remaining surfaces blue after one flexing.
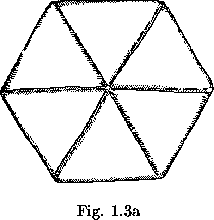
It has not doubt been noticed how carefully it was stressed that the thumbhole hinges be creased upward. The possibility of folding the thum-bhole hinges down, and thereby folding, the other hinges up, has not been considered. Since everything we learn about the flexagon involves breaking former rules, we will of course try doing this. We meet inmediate dis-couragement, however, for we can no longer flex. But since we are not easily dissuaded, we notice that if we were to create a new thumbhole under the thin pats, we might then flex anyway. Indeed the thumbhole seems simply to be a slash sideways through each thick pat. If one could effect such a slitting through the single pats with a sharp knife, it might be possible to create the desired thumbhole. A much more feasible plan involves adding in three extra leaves in the proper places, modeling the new pats on the already-double pats (figure 1.3a). When the color pattern has been repaired and the long sought after flexing has been performed, a new surface or, as it is called, a new ``side", will be exposed.
This seems natural enough in itself, but it leads to an interesting conclusion. Whenever we come to a position from which we can flex along only one set of hinges, we can always rotate an extra ![]() between flexings, then add in three new leaves and flex anyway. Therefore, we can now build a flexagon of any arbitrary size, with the sides appearing in any desired order. As a matter of fact, we could say that the three ``sided" flexagon was derived in this manner, by slitting, from an ordinary hexagon.
between flexings, then add in three new leaves and flex anyway. Therefore, we can now build a flexagon of any arbitrary size, with the sides appearing in any desired order. As a matter of fact, we could say that the three ``sided" flexagon was derived in this manner, by slitting, from an ordinary hexagon.
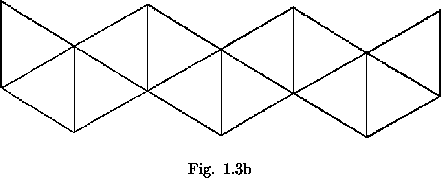
Now that we can build inductively any flexagon, let us re-examine the flexagon of ``order" four -that is, the four ``sided" flexagon we obtained by slitting the first flexagon. The experimenter may wisely have decided to cut a hinge and lay the flexagon out flat, exhibiting what is know as its ``plan". The term ``plan" refers to the pattern of the paper strip from wich the flexagon is folded up. In this way can bee seen what has happened to the shape of the strip during the slitting. The strip is no longer straight. It is made up roughly ``C" - shaped groups of triangles (see figure 1.3b). One triangle of each ``C" may be folded over an adjacent triangle, similarly in each ``C", to yield the straight strip of nine triangles that we know can be would up into a three ``sided" flexagon. This operation is the inverse of the slitting operation.
Now that we have learned the ``plan" for this particular type of flexagon, we can make as many more like it as we please. If we build new flexagons by ``slitting", or creating thumbholes, we will be able to increase the number of flexagons whose plans we know how to build to any desired extent.
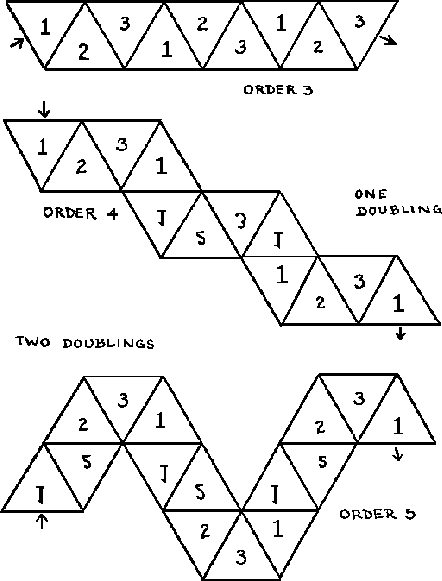
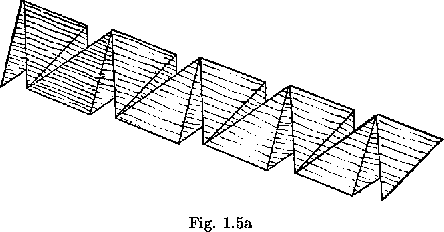
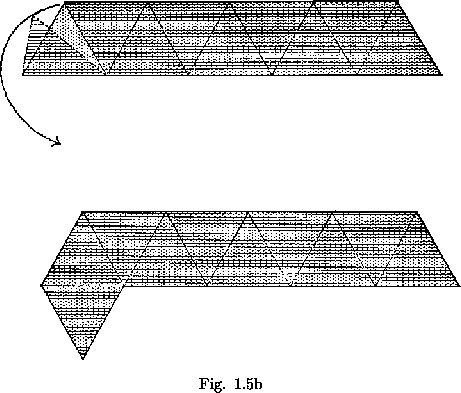
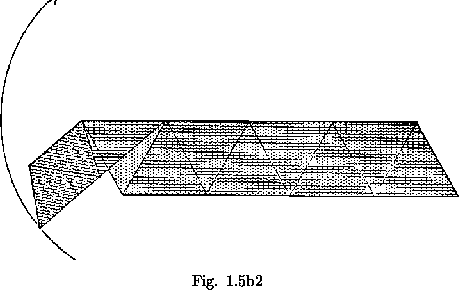
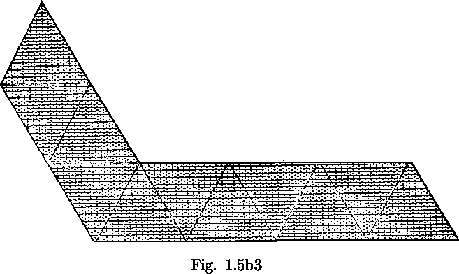
Some flexagons will be easier to build than others, for the simple reason that their plans will be more easily cut out. There is a certain family of flexagons, for example, all of whose members are formed from straight strips of paper. When we folded the ``C" of the order four flexagon into a straight strip, every third triangle of the straight strip came out double. If we double the first two in every three triangles (see figure 1.4), this corresponds to another slitting and results in a flexagon of order 5. If all nine triangles are doubled, the resulting flexagon is of order 6 (figure 1.5a). Opening out this last flexagon, we see that the uniform doubling of all the triangles produces another straight strip, twice as long as the first (figure 1.5b).
Are there more ``straight strip" flexagons? Clearly we could again
double the number of triangles, obtaining a twelve sided flexagon made from a
straight strip 36 triangles long. In this case, each of the nine triangles in
the original strip would have become a stack of four. This doubling process may
be continued until we run out of paper. Each flexagon will be of order
![]() ,
the number of triangles used will be
,
the number of triangles used will be
![]() ,
and the number of leaves heaped up under each of the nine final
triangles in the straight strip will be 2n.
The nth flexagon will always be formed from the (n - 1)st.
,
and the number of leaves heaped up under each of the nine final
triangles in the straight strip will be 2n.
The nth flexagon will always be formed from the (n - 1)st.
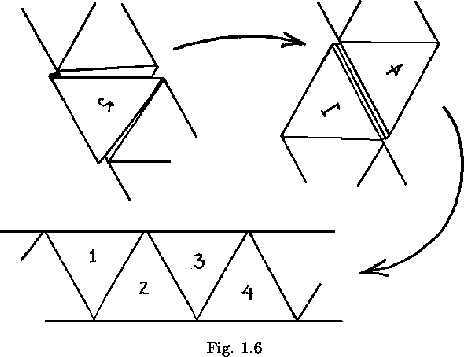
Let us return to the straight strip of 36 triangles which has been twisted double twice to form the straight strip of nine heaps (order = 12). These heaps of four triangles each have an interesting property that allows us to create many more straight strip flexagons than we can using the doubling method alone. We observe that if we replace a heap of four triangles by a single leaf, or viceversa, the straightness of the strip remains unimparied (see figure 1.6). The significance to be found in this is that, at any three positions that will be separated by the same number of leaves when the ends of the plan have been joined, we can substitute a heap of four triangles for a single leaf, and still keep a straight strip plan. This adds three new sides to the flexagon. Therefore we can now construct flexagons having order of the form 3n from a straight strip.
An interesting approach to the non-straight strip flexagon is its consi-deration not as a slitting product of lower order flexagons, but as a higher order straight strip flexagon, some of whose sides have been unslit, i.e., glued shut.
``Straight strip" flexagons have in general been given the appellation ``regular", although the only things distinguishing them from other, ``irre-gular", flexagons are the ease with which they are built and a certain amount of symmetry which certain of them possess in respect to operation.
Now that any required flexagon can be built, certain purely practical problems begin to arise. Since these may be of interest to the reader, several such details have been brought forth and discussed in Appendix A.
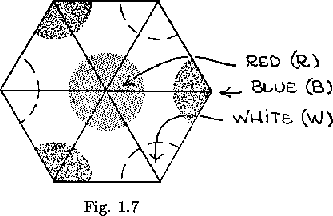
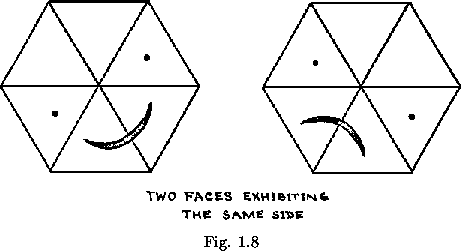
We can at this point perceive a number of elementary relationships that are basic to further study of the flexagon. First, it is easily shown that the total number of leaves must always be three times the order of the flexagon, since every side of every leaf is used. This gives the six leaf faces required for each ``side". Second, every flexagon plan must be reducible by folding to a straight chain of nine piles of triangles, from which the flexagon can be made. To make our third observation, we first place some form of marking device at each of the three corners of one or more of the top leaves of each side, as shown in figure 1.7. As the flexagon is now flexed and turned over, and the various sides are approached via various other sides, the marking devices, or ``dots", indicate that different angles of the leaves are brought to the center of the flexagon at different times. Interesting results have been obtained with this phenomenon through the use of pictures or designs as ``dots"; an example of this due to Alan Phillips appears in figure 1.8.
Since there are two different kinds of pats, arranged alternately about the center of the flexagon, there are in a sense two different kinds of leaf faces making up each side. A flexing will then, fold together pairs of similarly colored leaf faces, but only one each of the two types, because it always folds together pairs of adjacent leaf faces. We are assuming, of course, that each ``side" is marked with a single color. Also each color used in the flexagon is related to at most two other colors, in the sense that the two will occupy opposite faces of the same leaf. In fact, the number will always be two, if the flexagon has more than two sides. These two facts lead to the empirically substantiated deduction that, if one were to fold together one ``side" of the flexagon, so that only one color showed, and then read off the colors in the order in which they would appear as one passed through each stack of triangles, this order would be found invariant, for any given flexagon. The side showing at each position where this constant order of colors was recorded would both begin and end the sequence in each case, but the colors would remain in the same positions relative to one another. This important observation should be carefully noted by the reader, since it provides a foundation for several later considerations. The inmediate application is the observation that, if we are given a properly colored plan, we can, by folding together adjacent leaf faces which are colored the same, eventually assemble the flexagon. Faces of one selected color are not to be folded together; this will be the color showing when the process has been completed.
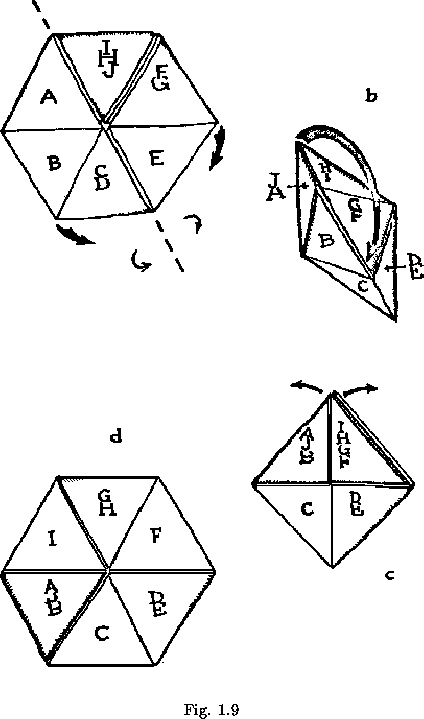
There remains a relatively well know but much dreaded aspect of the flexagon. This is the distortion of the heretofore constant order of the sides in the flexagon structure, which is usually accomplished accidentally, and wich often results in a disassembly and consequent reassembly of the flexagon involved. The process is aptly called ``distortion", for it involves forcing of the supposedly rigid leaves. The easiest method of distortion is that in which the flexagon is folded double in a downward direction along a diagonal (see figure 1.9a). The center is the opened out to form a six faced cup (figure l.9b). The two sets of leaves at one end of the cup are then folded in upon the middle pair (figure 1.9c). The flexagon now opens out disclosing a set of ``sides" in which two pats are of one color and the remaining four of another (see figure 1.9d). This is a specialized operation, and it requires a specialized pat structure. In order to distort a flexagon in this manner, alternate pats must be made up of at least three leaves, with the thumbhole at least two leaves down away from the top of the pat. The remaining pat must be of at least double thickness. The flexagon of order 5 is the simplest flexagon that can be made to meet this requirement. However, a flexagon-like object which will not flex until distorted may be made from a straight strip of ten triangles. After distortion, it becomes of order 3. This is the object shown operating in figure 1.9a, if all the subpats A, B, C, etc. are of a single thickness only. Note that the requirements for doing this operation backwards (which is much harder) are not so demanding. A few more details on the subject of distortions may be found in Appendix D.