Although the mode of building and operating the flexagon has been demons-trated, it may be noted that some further knowledge is necessary, for, through random flexing, it is found difficult to ``visit" a desired side or even to find out if there are other sides. Our present interest is to devise a methodical system for finding any given side, usuable in operating any flexagon.
As with flexagon construction, we start with the simplest true flexagon, which is of order 3. Due to the nature of the flexagon's operation, we visit the sides consecutively, and, unless the flexagon is turned over, always in the same order:
This is represented graphically by a triangle, as shown in figure 2.1. We visit side 1, then side 2, then side 3; then we go back to side 1 again. If the flexagon is turned over the sequence is reversed:
It is clear that this also may be represented by figure 2.1. The problem now is this: If we are not sure whether or not the flexagon has been turned over, and we desire to know which side will next turn up, how can we tell? We may see that the side showing is marked 1. We can now read another number, say 2, off the back of the flexagon. Then the next side turned up from side 1 will be marked 3, since 3, 2, and 1 make up the triangular system of figure 2.1.

If we choose, we way instead try to flex the flexagon along the wrong pair of hinges, as mentioned in Chapter I. That is, we may decide to slit the three single pats and make a flexagon of order 4, in which we could also move from 2 on the back and 1 on the front to a new side, 4. It should now be noted that, in the process of flexing, the side that was last showing goes to the bottom surface of the flexagon, so that 4 will be on top and 1 on the bottom in the new position. The Moebius band type of operation between sides 1 and 4 was identical to that between sides 1 and 3, so that we should now be able, with another flexing operation, to obtain a new position, with side 2 on top and 4 on the bottom. Using this conclusion, we can construct a ``map" of the new flexagon (shown in figure 2.2). The new map operates just as the simplier order 3 map did, and as all subsequent maps will; i.e., the side on the back of the flexagon, the side on the front, and the side next to come up are represented by the vertex of a single triangle. This essential property of maps will clearly be uninfluenced by simple transformations such as rotations, reflections, and such that may act upon it.
Any desired flexagon may be produced by the process of slitting along hinges. This corresponds to the addition of a new face on the map, between two others, in the manner just shown. Thus any flexagon built by slitting will correspond to a unique map, of a more or less complex type. It is thus possible to obtain the map of a given flexagon through experimentation, by seeing which positions of the flexagon admit of two possibilities for the next side to turn up, and noting down this information in map form. Then, by following routes which the map says are possible, we can expose any given side at will.
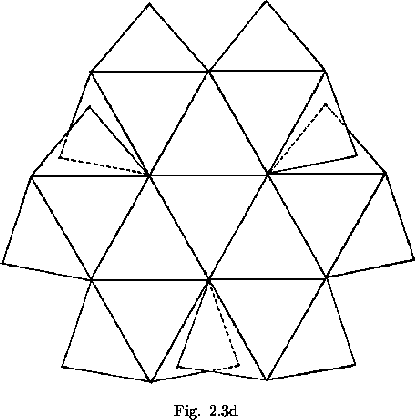
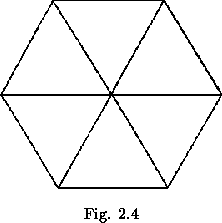
Doubling the straight strip from which a previous straight strip flexagon was made corresponds to adding in a new side between each pair of sides on the map of the old flexagon wherever possible, or adding on a new map triangle at each exposed edge of the map, as shown in figure 2.3. The overlapping the map of the flexagon of order 24 has no inmediate significance. It is worth noticing that the flexagon map leaves room upon its periphery for the point representing each side. Forms such as that shown in figure 2.4, in which triangle vertices are entirely enclosed, are impossible.
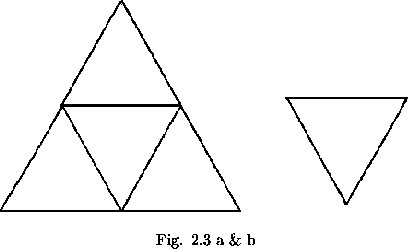
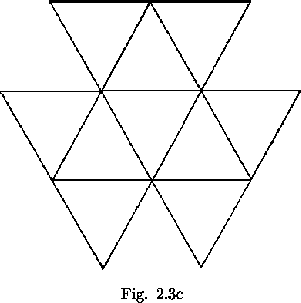
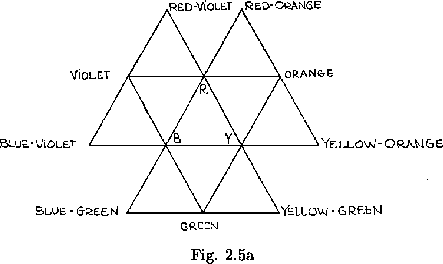
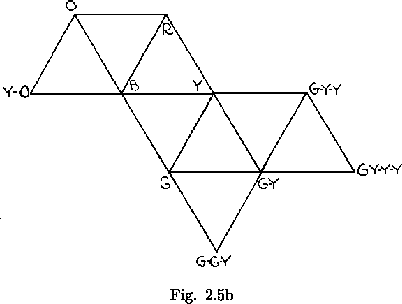
The three-fold symmetry of the maps of the above examples of straight strip flexagons indicates a fine coloring system which makes memorization of the map an easy matter, hence speeding up the study or observation of any given flexagon. The three flexagon sides represented by the central triangles in figure 2.3 are painted red, yellow, and blue, respectively. The other flexagon side in the map triangle containing both red and yellow is painted with a mixture of the two; orange. Similarly, other sides are colored by mixing colors of sides already painted (fig.2.5a). I this manner as many colors as the eye can distinguish from one another may be painted on large flexagons. The same scheme may also be used on flexagons other that straight strip flexagons, these then being treated as deletions of higher order straight strip flexagons. An example of this coloring scheme is given in figure 2.5b.
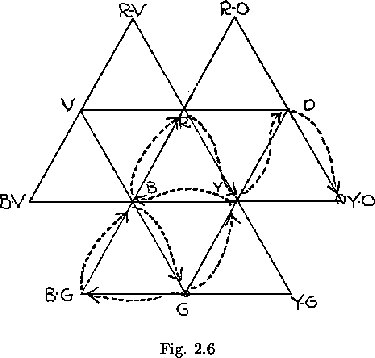
Suppose that a 12 sided straight strip flexagon has been made and colo-red, and that we desire to see the yellow orange side. Suppose, moreover, that the sides now showing are blue green, on top, and green, underneath. The path we would then follow to reach yellow-orange would be that shown in figure 2.6.
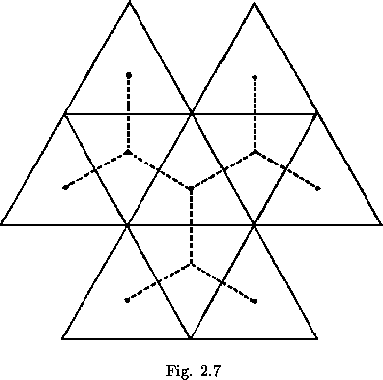
The map system of flexagon representation gives us a method which determines any flexagon uniquely by means of an array of triangles. If we further let each map triangle be replaced by its midpoint, and then connect the midpoints as the triangles were connected, a branched affair results which is also characteristic of the respective flexagon. This is know as the Tuckerman tree, named after Profesor L. B. Tuckerman, Sr., its inventor (see figure 2.7).
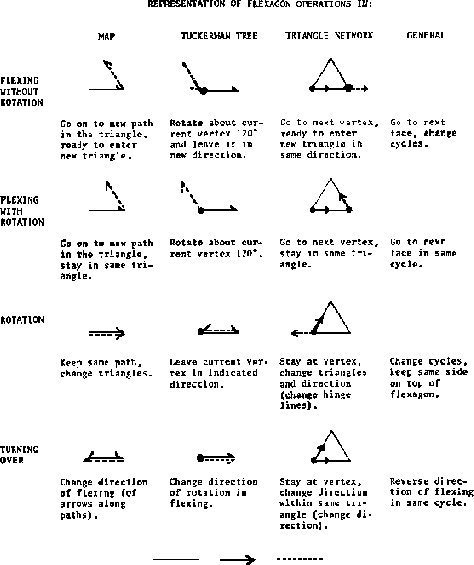
Each operation or group of operations performed on the flexagon can be represented in terms of each of its various ``maps" The chart shown in figure 2.8 gives each of the basic operations and its various representations. The Tukey triangle network, or hinge network, is included, although it is to be discussed in Chapter III. The rules used in applying these other representations of the flexagon operations to working the flexagon may be derived directly from the rule used for the map, which is that the points representing the three sides shown over the course of one flexing, including sides shown on the bottom of the flexagon, must lie at the vertices of a single map triangle. The term ``path" in figure 2.8 refers to a line segment joining two adjacent points in the tree or map.
Since the various forms of the map merely provide diferent graphical representations of the two operations of flexing and rotating, it can be generalized that every flexagon may be characterized as a space in which we can perform certain unique combinations of these operations. Every flexagon, then, can be described as some portion of a covering space that represents all combinations of these operations. Such a covering space may be constructed as follows: Within a circle, construct three arcs tangent to each other at the circumference, as shown in figure 2.9a. To fill the covering space we reflect all that lies without the circle of any given inner arc through the inner arc into the circle out side the arc (see figure 2.9b). If this reflecting operation is repeated indefinitely upon all the arcs produced, the reflections will approach the circumference of the original circle. A later step in the production of the covering space is shown in figure 2.9c. When the curves making up some portion of this covering space are bent straight and made equal in length, a flexagon map results in each case. Thus the covering space as a whole represents a hypothetical ``ultimate" flexagon, from which any other flexagon could be produced by deleting various sides.
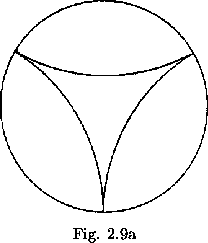
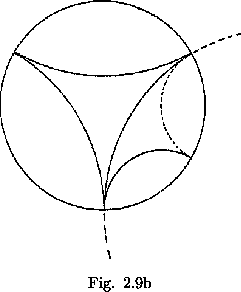
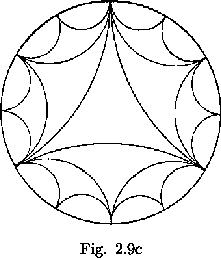
To interpret the covering space, we notice that the reflecting operation, which produces an identity when performed twice in succession through the same mirror or arc, represents flexagon rotation, which also produces an identity when performed twice successively, and the choice of a curve through which to reflect, which is equivalent to rotating from arc to arc within any one small area of the covering space, and thereby produces an identity when performed three times successively, corresponds to flexing, which similarly produces an identity when performed three times in succe-ssion. This device indicates that, as we perform the operation of rotating the flexagon or splitting it to find a new side, which operation we identify with a new reflection in the covering space, we enter a new area or subspace within the co-vering space. To enter a space within another arc of the covering space, we must first regain entry into the old space. To demonstrate what is meant by this, we may refer to the traverse of the order 12 flexagon which was discussed earlier. From the outer space (BG - B - G; see figure 2.6) it was first necessary to reenter the intermediate space G - B - Y and then the central space R - Y - B before reaching yellow orange, which lies between red and yellow; i.e., within a different primary arc on the covering space. We see from symmetry that the primary or original area in the covering space can be identified with any area in the covering space, since, when the covering space is completed, all are equivalent.
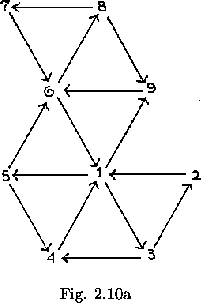
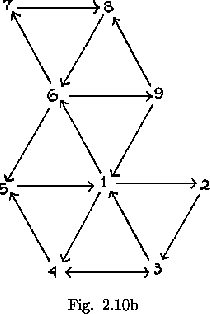
It will be noticed that one can never travel in both directions along the same path in a map without turning the flexagon over. That is, if some side A is on top and another side B is on the bottom, the only way in which B can be placed on top and A on the bottom is by turning over the flexagon. Therefore, for any given position, and eliminating the operation of turnin over, a system of arrows can be drawn along the various lines in the map, showing the direction of travel on these paths. In the map shown in figure 2.10a, side 1 can be approached from at most three different sides. The arrows indicating this are drawn as shown. If the flexagon is turned over, all arrows are reversed. Just three approaches are still possible in the present case (figure 2.10b). Note that marked paths connecting a given map vertex with the adjacent vertives are directed alternately toward and away front the given point.
Now let us follow an individual angle of a leaf as the flexagon is operated. For this purpose, a dot is placed at the vertex that is located at the center of the flexagon, of one of the leaves showing at some face. when the flexagon is then flexed, the dot is then found to lie on the outside edge of the flexagon. With every rotating and flexing operation, the dot is moved about the midpoint of the leaf ![]() more in respect to the center of the leaf. If flexing is performed without rotation, the dot is moved back
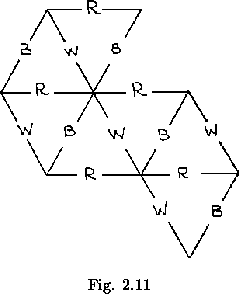
more in respect to the center of the leaf. If flexing is performed without rotation, the dot is moved back ![]() to its previous position. This is explained by the fact that, with a continuous flexing operation, in which the same hinge is maintained between pairs of changing pats, the only possible change in the angle of a leaf toward the center always switches the two at the ends of the remaining hinges. These angles pass between alternate stages of being at the center and at the edge of the flexagon. When the constant flexing is interrupted, the third angle goes to the center. To make all of this easily seen in a flexagon, fold all the pats together, forming one large pat-like structure, and dip each angle in ink or dye, so that each is a different color from the others. When completed and opened out, such a flexagon should resemble figure 1.7. Suppose, for example, that the colors used for the dyeing have been red (R), white (W), and blue (B). Then a map may be drawn in which the color at the center of the flexagon for each position is indicated at the corresponding position on the map. Such a map is shown in figure 2.11. It can be shown,
using the facts mentioned above, that all parallel lines in the map will be of the same color. It can now be found at what time any given dot will lie in any given position. This flexagon futher demonstrates that, just as the order of the leaves is constant, so is the relative position of the angles and hinges.
to its previous position. This is explained by the fact that, with a continuous flexing operation, in which the same hinge is maintained between pairs of changing pats, the only possible change in the angle of a leaf toward the center always switches the two at the ends of the remaining hinges. These angles pass between alternate stages of being at the center and at the edge of the flexagon. When the constant flexing is interrupted, the third angle goes to the center. To make all of this easily seen in a flexagon, fold all the pats together, forming one large pat-like structure, and dip each angle in ink or dye, so that each is a different color from the others. When completed and opened out, such a flexagon should resemble figure 1.7. Suppose, for example, that the colors used for the dyeing have been red (R), white (W), and blue (B). Then a map may be drawn in which the color at the center of the flexagon for each position is indicated at the corresponding position on the map. Such a map is shown in figure 2.11. It can be shown,
using the facts mentioned above, that all parallel lines in the map will be of the same color. It can now be found at what time any given dot will lie in any given position. This flexagon futher demonstrates that, just as the order of the leaves is constant, so is the relative position of the angles and hinges.
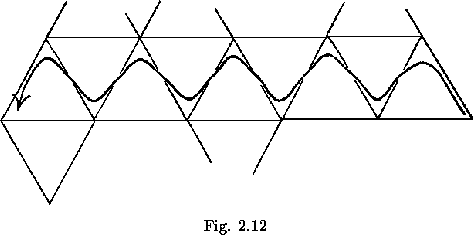
The simplest method, independent of the map, or when the map is unknown, or finding every face of a given flexagon, and, in so doing, of traveling over every path in the map of the flexagon in the shortest possible time, is a method know as the Tuckerman traverse, named after Bryant Tuckerman. The rule is that flexes are to be performed consecutively as long as possible, followed by a rotation only when necessary. It can be seen that, in a flexagon of order three, the only possible sequence of ope-rations is the original 123123... , and hence this will be the path followed by the Tuckerman traverse. Following the rule in higher order flexagons, we discover that the paths traversed during one ``roll" (one uninterrupted sequence of flexes, along a given hinge) form the pattern shown in figure 2.12 in the map, first turning one way and then the other.
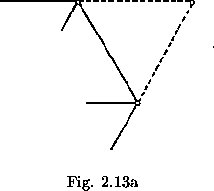
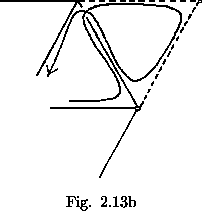
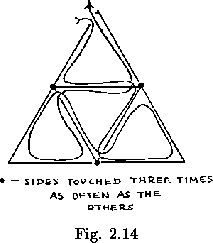
Each higher order flexagon may be formed from a flexagon of lesser order by the addition of pairs of paths such as that shown in figure 2.13a. The traverse follows each of these pairs in the manner shown in figure 2.13b. Then three extra flexes and one extra rotation are required for each pair added (Fig. 2.14). Since three flexes and three rotations are required in the flexagon of order three, it may be stated that, for any given flexagon, every side may be visited and every path used in 3N-6 flexes and N rotations, where N is (as throughout) the order of the flexagon. Also, since each side added requires that one half twist be added into each unit of the flexagon, the number of half twists in the band making up the flexagon will be 3N-6 (no twists are needed for the first two sides), which happens to be the same as the number of flexes used in following the Tuckerman traverse. In the course of the Tuckerman traverse, some sides will be noticed to turn up oftener than others. This is because they are touched by more paths in the map.
